[!NOTE]
本教程是《SpringBoot系列基础教程》之一,教程目录:https://laisc7301.github.io/blog/2024/01/29/202401290001SpringBoot%E7%B3%BB%E5%88%97%E5%9F%BA%E7%A1%80%E6%95%99%E7%A8%8B/
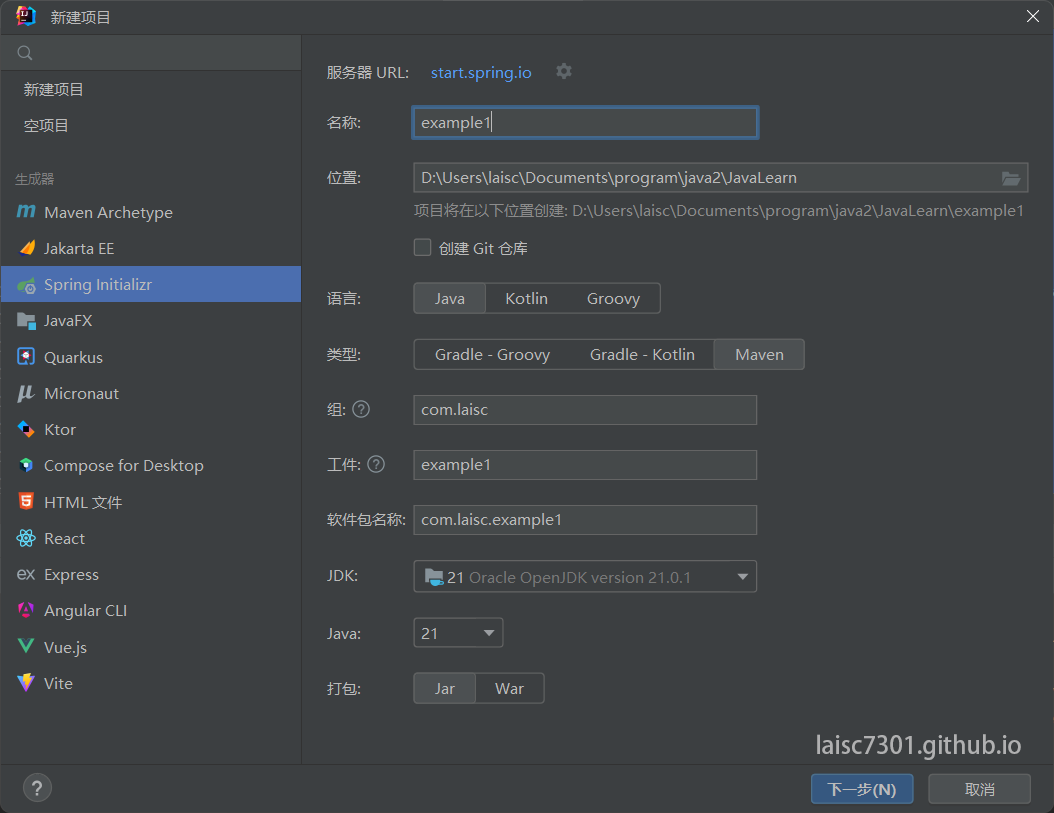
首先按照图示新建项目:

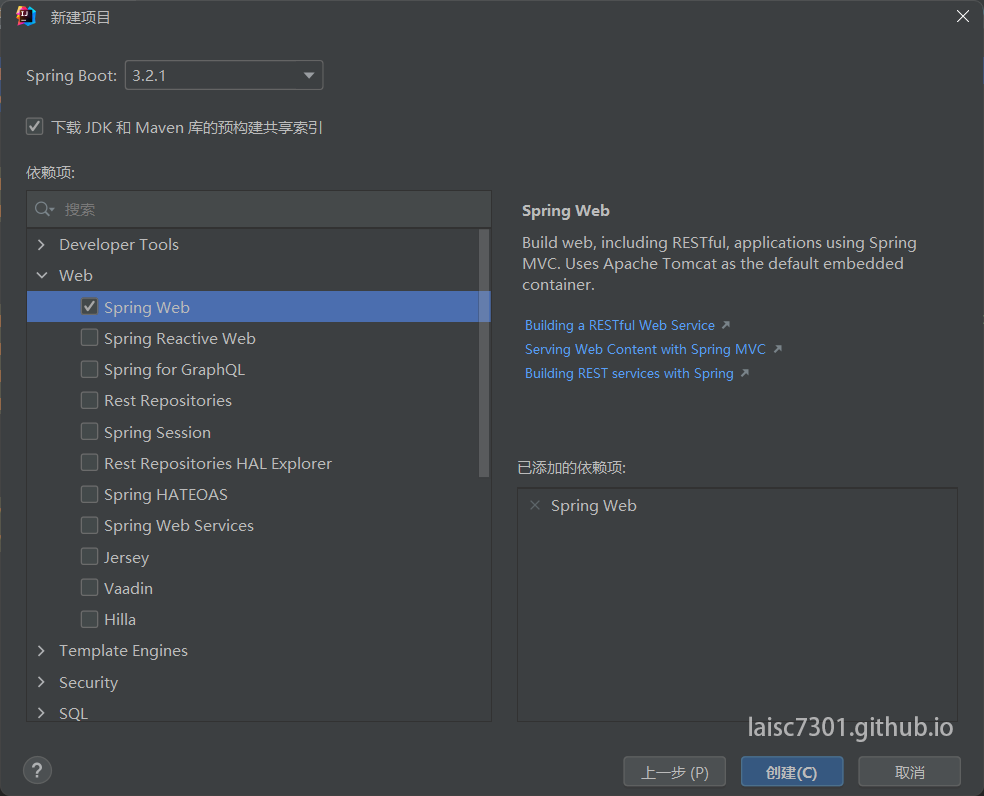
添加以下依赖:

找到application.properties文件,并写入下面内容:
这样服务的端口就由默认的8080变成了8001
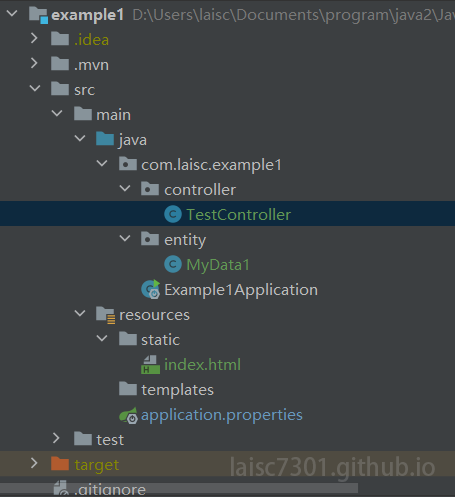
整个项目的文件结构如下图所示:

首先,static下的文件是网站的静态文件,里面的文件会直接显示出来,就像静态网站一样。
里面的index.html内容如下:
1
2
3
4
5
6
7
8
9
10
| <!DOCTYPE html>
<html lang="en">
<head>
<meta charset="UTF-8">
<title>Title</title>
</head>
<body>
Hello, world!
</body>
</html>
|
此时如果直接访问http://localhost:8001/ ,就会看到Hello, world!页面。
先把TestController的代码放出来:
TestController.java
1
2
3
4
5
6
7
8
9
10
11
12
13
14
15
16
17
18
19
20
21
22
23
24
25
26
27
28
29
30
31
32
33
34
35
36
37
38
39
40
41
42
43
44
45
46
47
48
49
50
51
52
53
54
55
56
57
58
59
60
61
62
63
64
65
66
67
68
69
70
71
72
73
74
75
76
77
78
79
80
81
82
83
84
85
86
87
88
| package com.laisc.example1.controller;
import com.laisc.example1.entity.MyData1;
import jakarta.servlet.ServletException;
import jakarta.servlet.http.HttpServletRequest;
import jakarta.servlet.http.HttpServletResponse;
import org.springframework.stereotype.Controller;
import org.springframework.web.bind.annotation.*;
import java.io.IOException;
import java.io.PrintWriter;
@Controller
@RequestMapping("/test")
public class TestController {
@ResponseBody
@RequestMapping("/hello")
public String hello() {
return "Hello, SpringBoot!";
}
@ResponseBody
@RequestMapping("/test1")
public String test1(@RequestParam("vara") String vara) {
return "vara = " + vara;
}
@ResponseBody
@GetMapping("/test1_1")
public String test1_1(@RequestParam("vara") String vara) {
return "vara = " + vara;
}
@ResponseBody
@PostMapping("/test1_2")
public String test1_2(@RequestParam("vara") String vara) {
return "vara = " + vara;
}
@ResponseBody
@RequestMapping("/test2")
public String test2(@RequestBody MyData1 myData1) {
return "myData1 = " + myData1.toString();
}
@ResponseBody
@RequestMapping("/test3/{text1}")
public String test3(@PathVariable("text1") String text11) {
return "text1 = " + text11;
}
@RequestMapping("/test4")
public void test4(HttpServletRequest request, HttpServletResponse response) throws IOException {
String requestUrl = request.getRequestURL().toString();
String action = request.getServletPath();
String requestUri = request.getRequestURI();
String queryString = request.getQueryString();
String name = request.getParameter("name");
String method = request.getMethod();
response.setCharacterEncoding("UTF-8");
response.setHeader("content-type", "text/html;charset=UTF-8");
PrintWriter out = response.getWriter();
out.write("获取到的客户机信息如下:");
out.write("<hr/>");
out.write("请求的URL地址:" + requestUrl);
out.write("<br/>");
out.write("请求的地址:" + action);
out.write("<br/>");
out.write("请求的资源:" + requestUri);
out.write("<br/>");
out.write("请求的URL地址中附带的参数:" + queryString);
out.write("<br/>");
out.write("请求的name参数:" + name);
out.write("<br/>");
out.write("请求使用的方法:" + method);
}
@RequestMapping("/test5")
public void test5(HttpServletRequest request, HttpServletResponse response) throws ServletException, IOException {
request.getRequestDispatcher("/test/test4?name=me").forward(request, response);
}
}
|
要注意TestController.java开头有这样一段:
1
2
| @Controller
@RequestMapping("/test")
|
@RequestMapping("/test")的意思是此类下所有页面链接都是在/test底下的。
看这一段:
1
2
3
4
5
| @ResponseBody
@RequestMapping("/hello")
public String hello(){
return "Hello, SpringBoot!";
}
|
此时如果访问http://localhost:8001/test/hello ,会看到:
Hello, SpringBoot!
看这一段:
1
2
3
4
5
| @ResponseBody
@RequestMapping("/test1")
public String test1(@RequestParam("vara") String vara){
return "vara = " + vara;
}
|
此时如果用POST或者GET把vara=123提交到http://localhost:8001/test/test1 ,会看到 :
vara = 123
看这一段:
1
2
3
4
5
| @ResponseBody
@GetMapping("/test1_1")
public String test1_1(@RequestParam("vara") String vara){
return "vara = " + vara;
}
|
此时如果访问http://localhost:8001/test/test1?vara=123 ,会看到
vara = 123
看这一段:
1
2
3
4
5
| @ResponseBody
@PostMapping("/test1_2")
public String test1_2(@RequestParam("vara") String vara){
return "vara = " + vara;
}
|
此时如果用POST把vara=123提交到http://localhost:8001/test/test1 ,会看到
vara = 123
看这一段:
1
2
3
4
5
| @ResponseBody
@RequestMapping("/test2")
public String test2(@RequestBody MyData1 myData1){
return "myData1 = " + myData1.toString();
}
|
这一段略微复杂一点,浏览器需要提交json数据。
先来看看MyData1的代码:
MyData1.java
1
2
3
4
5
6
7
8
9
10
11
12
13
14
15
16
17
18
19
20
21
22
23
24
25
26
27
28
29
30
31
32
33
34
35
36
37
38
39
40
41
42
43
44
45
46
47
48
49
50
| package com.laisc.example1.entity;
public class MyData1 {
private int id = 0;
private String username="";
private String password="";
public MyData1() {
}
public MyData1(int id, String username, String password) {
this.id = id;
this.username = username;
this.password = password;
}
public int getId() {
return id;
}
public void setId(int id) {
this.id = id;
}
public String getUsername() {
return username;
}
public void setUsername(String username) {
this.username = username;
}
public String getPassword() {
return password;
}
public void setPassword(String password) {
this.password = password;
}
@Override
public String toString() {
return "MyData1{" +
"id=" + id +
", username='" + username + '\'' +
", password='" + password + '\'' +
'}';
}
}
|
看到MyData1里面有3个变量:id、username、password,这就是要提交的json数据。
比如提交下面数据到http://localhost:8001/test/test2 :
1
2
3
4
5
| {
"id": "123",
"username":"abc",
"password":"def"
}
|
你会得到下面结果:
1
| myData1 = MyData1{id=123, username='abc', password='def'}
|
看这一段:
1
2
3
4
5
| @ResponseBody
@RequestMapping("/test3/{text1}")
public String test3(@PathVariable("text1") String text11){
return "text1 = " + text11;
}
|
这时如果访问http://localhost:8001/test/test3/12345 ,就会看到:
text1 = 12345
下面一段不难,就是字有点多。
1
2
3
4
5
6
7
8
9
10
11
12
13
14
15
16
17
18
19
20
21
22
23
24
25
26
27
28
29
| @RequestMapping("/test4")
public void test4(HttpServletRequest request, HttpServletResponse response) throws IOException {
String requestUrl = request.getRequestURL().toString();
String action = request.getServletPath();
String requestUri = request.getRequestURI();
String queryString = request.getQueryString();
String name = request.getParameter("name");
String method = request.getMethod();
response.setCharacterEncoding("UTF-8");
response.setHeader("content-type", "text/html;charset=UTF-8");
PrintWriter out = response.getWriter();
out.write("获取到的客户机信息如下:");
out.write("<hr/>");
out.write("请求的URL地址:" + requestUrl);
out.write("<br/>");
out.write("请求的地址:" + action);
out.write("<br/>");
out.write("请求的资源:" + requestUri);
out.write("<br/>");
out.write("请求的URL地址中附带的参数:" + queryString);
out.write("<br/>");
out.write("请求的name参数:" + name);
out.write("<br/>");
out.write("请求使用的方法:" + method);
}
|
访问http://localhost:8001/test/test4?name=aaa ,看结果。
最后看下面一段:
1
2
3
4
| @RequestMapping("/test5")
public void test5(HttpServletRequest request, HttpServletResponse response) throws ServletException, IOException {
request.getRequestDispatcher("/test/test4?name=me").forward(request, response);
}
|
访问http://localhost:8001/test/test5 ,访问的结果跟访问http://localhost:8001/test/test4?name=me 一样。
项目源代码下载:https://pan.baidu.com/s/1XBbPVe14KjCAcvsSFGkGRQ?pwd=g09i
下一篇:SpringBoot使用Thymeleaf:https://laisc7301.github.io/blog/2024/01/04/202401040000SpringBoot%E4%BD%BF%E7%94%A8Thymeleaf/


